
-
Table of contents
- Step 1 - preparing
- Step 2 – transferring the motif
- Step 3 – sawing
- Step 4 - touching up & sanding
- Step 5 - decorating (optional)
- Step 6 - creating the background
- Step 7 – applying varnish & glue
- Step 8 - attaching the picture hangers
-
Material
- Poplar plywood panel or similar of the size you’d like the final picture to be. Make sure you check the scroll saw table size so the panel can be rotated during sawing.
- Support panel with the same dimensions, e.g. rear panel of a cupboard
- Abrasive paper (180, 240, 320)
- 2 picture frame hangers
- 1 sheet of tracing paper
- Possibly grease remover
- Primer and paint for the background, black is used here
- Clear varnish
- Wood glue
-
Tools
- Scroll saw, e.g. scheppach Deco-XL
- Optional: hot air blower
- Optional: hand sanding machine
- Drill with 1.5/2mm drill bit
- Step 1 - preparing
- Step 2 – transferring the motif
- Step 3 – sawing
- Step 4 - touching up & sanding
- Step 5 - decorating (optional)
- Step 6 - creating the background
- Step 7 – applying varnish & glue
- Step 8 - attaching the picture hangers
First, we will prepare the timber panel. This entails sanding it with a hand sanding machine or by hand. We will start with 180 abrasive paper, followed by wiping the area with a damp cloth, then we will repeat the process with 240 and 320 abrasive paper. Depending on the timber used, the surface should be dried with a hot air blower, if needed, so the panel doesn’t distort.
This type of pre-sanding saves a lot of effort later because it makes reworking easier.


Pre-sanding also has the advantage that the motif is easier to transfer onto the timber panel. To do this, print out the desired motif in the right size. Motifs are easily enlarged or made smaller in the printer settings. The motif is transferred onto the timber panel using tracing paper. In this way, the motif can be used several times. Alternatively, it can also be glued onto the timber panel and the residue sanded off after sawing.


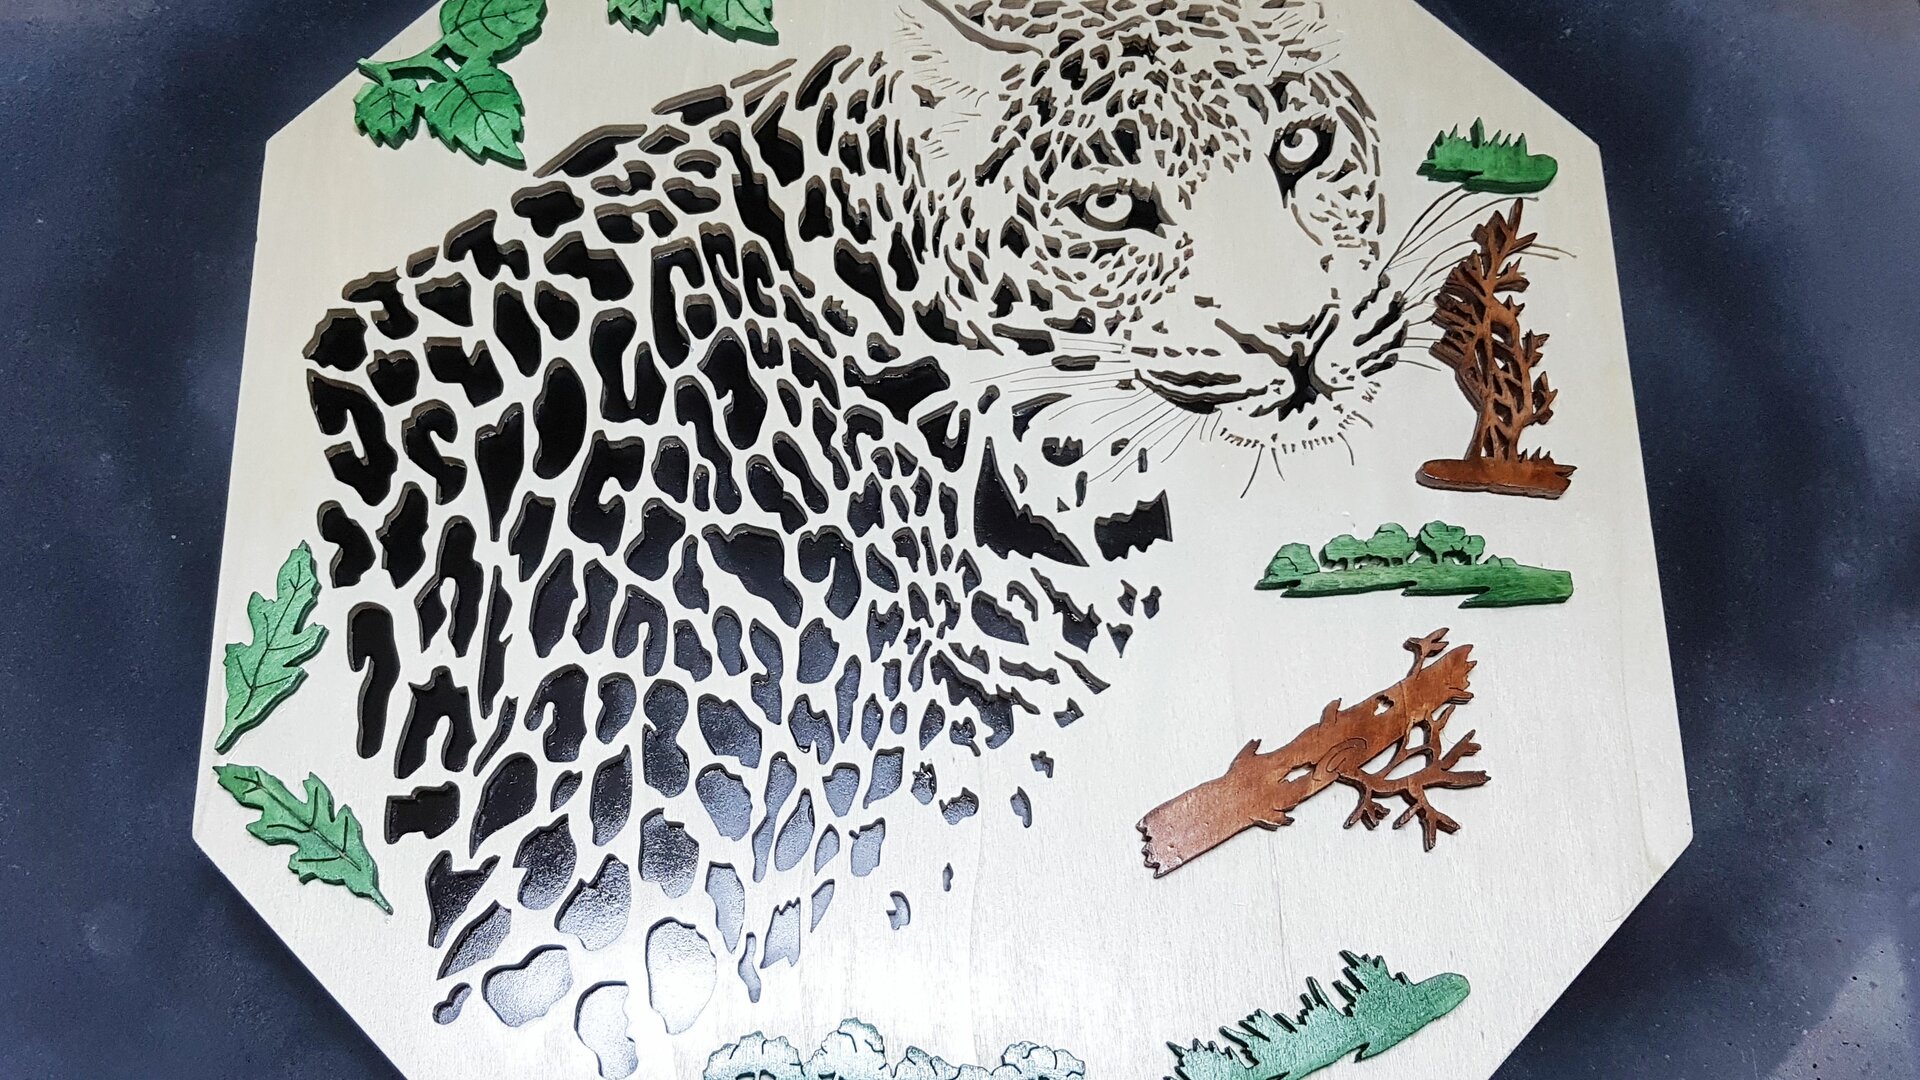
The scroll saw table size determines how big the picture can be. You can use a little trick here and remove the corners of the panel. That will give you an octagonal picture instead of a rectangular one.
Using the drill, make a small hole in each of the sections that will be cut out so you can guide the saw blade through it later. Especially fine lines, such as the whiskers, should come from a larger section to be cut out, if possible, so they don’t require their own drill hole.
The scroll saw’s blade is guided through the drill hole, clamped down and the contours of the motif sawn out one after the other. Speed isn’t important here but accuracy is.
Fine breakaway pieces and fibres on the cutting edges can easily be removed with a small diamond key file.
These frayed areas can sometimes be prevented, for example, by mirroring the motif before printing it out and fixing it to the back of the timber panel. For this, however, both sides must be prepared in Step 1. The frayed areas are then on the back of the picture.
Alternatively, choose a different saw blade. Using a saw blade with opposing teeth can prevent the majority of frayed areas. The following also applies: the more teeth, the cleaner the cut.
Once the entire motif has been cut out and the cutting edges have been touched up, sand the picture one last time to remove the residue of the sketched out motif.


The leopard can optionally be decorated with additional motifs. This can hide small errors that may have occurred during sawing.
Using templates as well, the decorations are transferred to the corners you removed from the poplar panel, sawn out, sanded and painted in the colour chosen by you.


A stable, thin panel is suitable as the background. In this case, we’ve used an old rear panel of a cupboard. The outer dimensions of the poplar panel are transferred to the background and sawn to shape.
Using 320 abrasive paper, the surface of the background is roughened and dust as well as grease removed, if required (e.g. with nitro). Apply the primer with a paint brush or a paint roller, leave it to dry, roughen it again, remove any dust and then apply the paint. In this case, we’ve used a matt black. Depending on the motif or your preferences, you can use any colour, of course.


The leopard is protected from environmental factors with clear varnish. It is important to apply the clear varnish before the motif is glued to the rear panel so the varnish does not accumulate in the indentations. After the motif has dried, stick it to the painted background using wood glue. Don’t use too much glue so it doesn’t run past the edges into the areas you have cut out.
Then glue on the decorations, carefully cover it all with a board or another panel and weights until the glue has dried.

After the glue has dried, all that is left to do is attach the two hangers to suspend your picture. Select the hangers depending on the picture’s weight. We’re using two picture frame hangers that are attached with small nails. It is important to attach the hangers at the same level parallel to the upper edge of the picture so it will hang straight later.

scheppach
Battery screwdriver

scheppach
scrol saw